Drag and Drop with AngularJS using jQuery UI
In the last couple of weeks I’ve started working with AngularJS. AngularJS is a great simple framework that allows you to create complete web-apps in javascript. It provides data-binding, templating and a lot of helper functions to create maintainable, readable and extendable browser based web applications. Lets first start with a disclaimer, I’m not an AngularJS guru, so some of the things here could probably have been done better, so if you have any comments, please let me know.
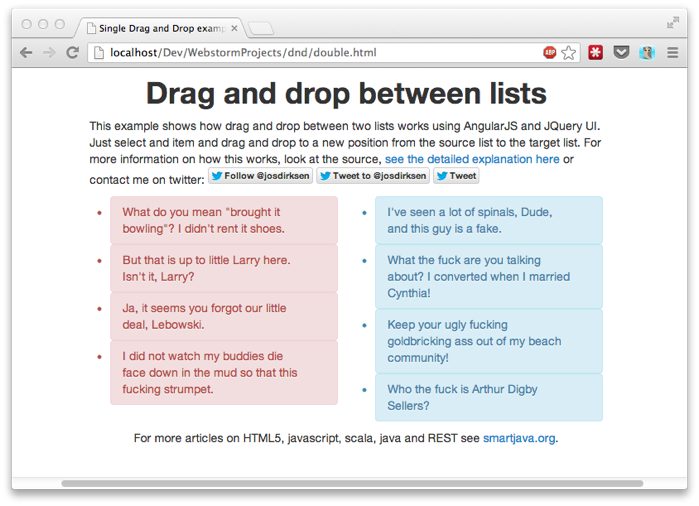
What I want to show in this article is how to create a directive that allows you to create simple drag and drop lists. This was something I needed for an application, but couldn’t find any good, complete and working examples for. There are some examples out there, but mostly for older versions of AngularJS. In this article we’ll look at the two following scenarios:
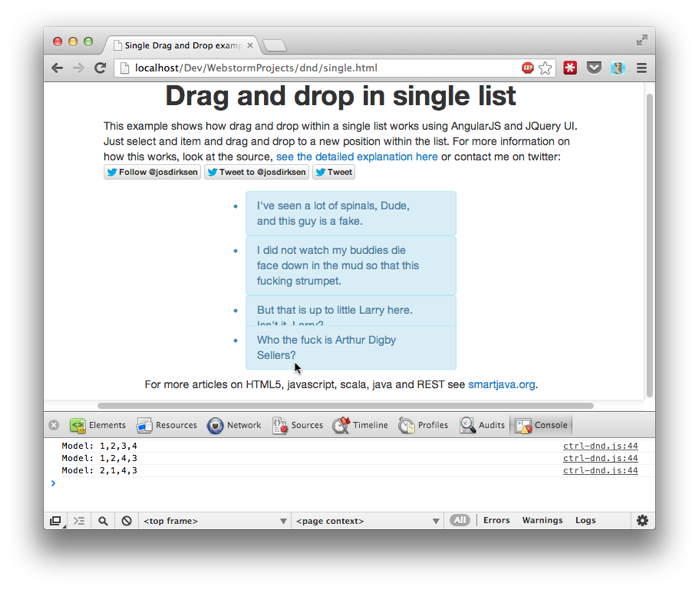
- Drag and drop within a single list: Probably the most common example, where you want to reorder an existing list by dragging items.
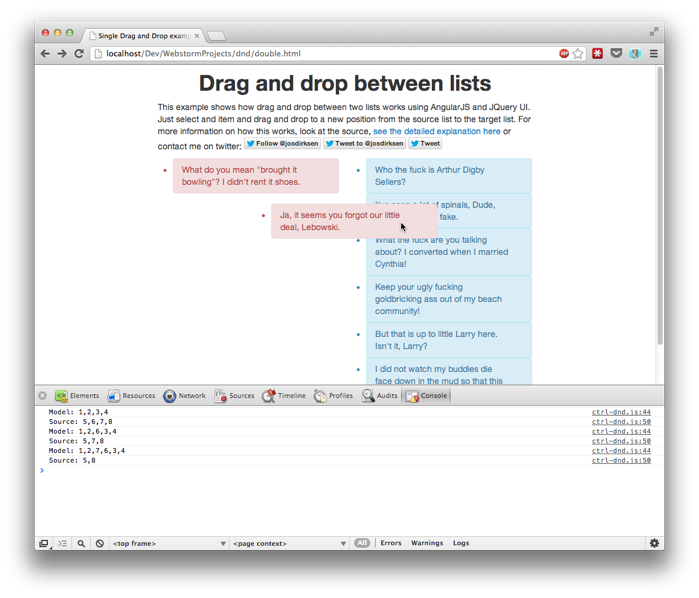
- Drag and drop from one list to another: Here we have one list that contains items that we want to drag and drop into a second list.

If you want to go directly to the examples:
Lets look at the code for these examples.
Drag and drop within a single list
We’ll start with the easy one, drag and drop within a single list. We’ll start with the html:
<!DOCTYPE html>
<html ng-app="dnd">
<body>
<div class="container" id="main"  ng-controller="dndCtrl">
    <div class="row">
        <div class="span4 offset4">
            <ul id="single" dnd-list="model">
                <li class="alert alert-info nomargin"
                    ng-repeat="item in model"></li>
            </ul>
        </div>
    </div>
</div>


<!-- load all the scripts -->
<script src="js/jquery-1.8.2.js" type="text/javascript"></script>
<script src="js/jquery-ui-1.9.2.custom.min.js" type="text/javascript"></script>
<script src="js/angular.js" type="text/javascript"></script>
<script src="js/bootstrap.min.js" type="text/javascript"></script>

<!-- load the app scripts -->
<script src="app/app.js" type="text/javascript"></script>
<script src="app/dir-dnd.js" type="text/javascript"></script>
<script src="app/ctrl-dnd.js" type="text/javascript"></script>

</body>
</html>
In this page we define a couple of AngularJS specifics. First we use “ng-app=dnd” to define the name of our application and we define an AngularJS controller with the name “dndCtrl”. You can also see that we create a list of items using “ng-repeat”. Last, but not least, we’ve defined a custom directive “dnd-list” to handles the drag and drop functionality. Before we look at this directive, lets quickly look at the the application (app.js) and the controller.
App.js:
var app = angular.module('dnd', []);
Nothing special, we just define the application.
The controller (ctrl-dnd.js):
function dndCtrl($scope) {

    $scope.model = [
        {
            "id": 1,
            "value": "Who the fuck is Arthur Digby Sellers?"
        },
        {
            "id": 2,
            "value": "I've seen a lot of spinals, Dude, and this guy is a fake. "
        },
        {
            "id": 3,
            "value": "But that is up to little Larry here. Isn't it, Larry?"
        },
        {
            "id": 4,
            "value": " I did not watch my buddies die face down in the mud so that this fucking strumpet."
        }
    ];

    // watch, use 'true' to also receive updates when values
    // change, instead of just the reference
    $scope.$watch("model", function(value) {
        console.log("Model: " + value.map(function(e){return e.id}).join(','));
    },true);
Also nothing special, just a dummy model, and a watch function to see if our drag and drop functionality works. The only item left is our drag and drop directive.
// directive for a single list
app.directive('dndList', function() {

    return function(scope, element, attrs) {

        // variables used for dnd
        var toUpdate;
        var startIndex = -1;

        // watch the model, so we always know what element
        // is at a specific position
        scope.$watch(attrs.dndList, function(value) {
            toUpdate = value;
        },true);

        // use jquery to make the element sortable (dnd). This is called
        // when the element is rendered
        $(element[0]).sortable({
            items:'li',
            start:function (event, ui) {
                // on start we define where the item is dragged from
                startIndex = ($(ui.item).index());
            },
            stop:function (event, ui) {
                // on stop we determine the new index of the
                // item and store it there
                var newIndex = ($(ui.item).index());
                var toMove = toUpdate[startIndex];
                toUpdate.splice(startIndex,1);
                toUpdate.splice(newIndex,0,toMove);

                // we move items in the array, if we want
                // to trigger an update in angular use $apply()
                // since we're outside angulars lifecycle
                scope.$apply(scope.model);
            },
            axis:'y'
        })
    }
});
As you can see from the code, it isn’t that complex. We have a single watch function that’s called whenever our model changes and store the updated model in a local variable. Next we use the JQuery UI sortable function, to enable drag and drop for our element. All we need to do know is make sure our backing model is kept consistent with the state on screen. For this we use the “start” and “stop” properties passed into the sortable function. In start we keep track of the element that was dragged, and in stop we push the element back at the changed position in the array. The last step we need to take is that we have to inform angular of this change. We’re working outside the lifecycle of angular so with scope.$apply we inform angular that it should re-evaluate the passed in expression. All this together looks like this (look at the console output to see the output from the watch function in our controller):

Next we’ll look at the changes you need to make to allow elements to be dragged between lists.
Drag and Drop from one list to another
The HTML for this looks pretty much the same, the only thing that is changed is that we now have two lists, with a slightly different attribute.
    <div class="row">
        <div class="span4 offset2">
            <ul id="sourceList" dnd-between-list="source,targetList">
                <li class="alert alert-error nomargin"
                    ng-repeat="item in source"></li>
            </ul>
        </div>
        <div class="span4">
            <ul id="targetList" dnd-between-list="model,sourceList">
                <li class="alert alert-info nomargin"
                    ng-repeat="item in model"></li>
            </ul>
        </div>
    </div>
What you see here is that besides passing in the model the list is working on, we also pass in the list to which it is connected. In a bit we’ll see how this is used. First though let’s look at our updated controller:
function dndCtrl($scope) {

    $scope.model = [
        {
            "id": 1,
            "value": "Who the fuck is Arthur Digby Sellers?"
        },
        {
            "id": 2,
            "value": "I've seen a lot of spinals, Dude, and this guy is a fake. "
        },
        {
            "id": 3,
            "value": "But that is up to little Larry here. Isn't it, Larry?"
        },
        {
            "id": 4,
            "value": " I did not watch my buddies die face down in the mud so that this fucking strumpet."
        }
    ];

    $scope.source = [
        {
            "id": 5,
            "value": "What do you mean \"brought it bowling\"? I didn't rent it shoes."
        },
        {
            "id": 6,
            "value": "Keep your ugly fucking goldbricking ass out of my beach community! "
        },
        {
            "id": 7,
            "value": "What the fuck are you talking about? I converted when I married Cynthia!"
        },
        {
            "id": 8,
            "value": "Ja, it seems you forgot our little deal, Lebowski."
        }
    ];

    // watch, use 'true' to also receive updates when values
    // change, instead of just the reference
    $scope.$watch("model", function(value) {
        console.log("Model: " + value.map(function(e){return e.id}).join(','));
    },true);

    // watch, use 'true' to also receive updates when values
    // change, instead of just the reference
    $scope.$watch("source", function(value) {
        console.log("Source: " + value.map(function(e){return e.id}).join(','));
    },true);
}
Not much has changed, we only added another simpel array we use as input for our source list, and added another listener that shows the content of that list on change. The only other thing we changed is that we added a new directive.
// directive for dnd between lists
app.directive('dndBetweenList', function($parse) {

    return function(scope, element, attrs) {

        // contains the args for this component
        var args = attrs.dndBetweenList.split(',');
        // contains the args for the target
        var targetArgs = $('#'+args[1]).attr('dnd-between-list').split(',');

        // variables used for dnd
        var toUpdate;
        var target;
        var startIndex = -1;
        var toTarget = true;

        // watch the model, so we always know what element
        // is at a specific position
        scope.$watch(args[0], function(value) {
            toUpdate = value;
        },true);

        // also watch for changes in the target list
        scope.$watch(targetArgs[0], function(value) {
            target = value;
        },true);

        // use jquery to make the element sortable (dnd). This is called
        // when the element is rendered
        $(element[0]).sortable({
            items:'li',
            start:function (event, ui) {
                // on start we define where the item is dragged from
                startIndex = ($(ui.item).index());
                toTarget = false;
            },
            stop:function (event, ui) {
                var newParent = ui.item[0].parentNode.id;

                // on stop we determine the new index of the
                // item and store it there
                var newIndex = ($(ui.item).index());
                var toMove = toUpdate[startIndex];

                // we need to remove him from the configured model
                toUpdate.splice(startIndex,1);

                if (newParent == args[1]) {
                    // and add it to the linked list
                    target.splice(newIndex,0,toMove);
                }  else {
                    toUpdate.splice(newIndex,0,toMove);
                }

                // we move items in the array, if we want
                // to trigger an update in angular use $apply()
                // since we're outside angulars lifecycle
                scope.$apply(targetArgs[0]);
                scope.$apply(args[0]);
            },
            connectWith:'#'+args[1]
        })
    }
});
Not that much different from the previous one. But a couple of things have changed. First we parse the arguments from our own list and from the target list. We do this so we know which items in our controller we need to update:
        // contains the args for this component
        var args = attrs.dndBetweenList.split(',');
        // contains the args for the target
        var targetArgs = $('#'+args[1]).attr('dnd-between-list').split(',');
We also add an additional watch so we always have the correct variables whenever these lists change in the backend. Finally, when we look at the sortable function, not that much is changed. We use an additional “connectWith” property to tie these two lists together, based on the supplied arguments to the directive. We’ve also needed to change our “stop” function. Instead of removing and reinserting the item in the same array, we remove it from the source one, and add it to the target one.
            stop:function (event, ui) {
                var newParent = ui.item[0].parentNode.id;

                // on stop we determine the new index of the
                // item and store it there
                var newIndex = ($(ui.item).index());
                var toMove = toUpdate[startIndex];

                // we need to remove him from the configured model
                toUpdate.splice(startIndex,1);

                if (newParent == args[1]) {
                    // and add it to the linked list
                    target.splice(newIndex,0,toMove);
                }  else {
                    toUpdate.splice(newIndex,0,toMove);
                }

                // we move items in the array, if we want
                // to trigger an update in angular use $apply()
                // since we're outside angulars lifecycle
                scope.$apply(targetArgs[0]);
                scope.$apply(args[0]);
            }
As you can see, all we do here is determine whether it was dropped on the specified target, or whether it was moved in the list itself. Based on this it is added to the correct model, and the models are updated. The output in the console looks like this:

We’re almost there, there is just one thing we need to take care off. What happens when one of our lists is empty? That would mean we can’t drop an item back from one list to another, since we can’t really see the empty list. To solve this we need to make sure, the empty list (the ul element) has a forced height. To do this we use the ng-class attribute, this attribute allows us to conditionally add a class based on the state of our model. To do this, first add the following helper methods to the controller:
    $scope.sourceEmpty = function() {
        return $scope.source.length == 0;
    }

    $scope.modelEmpty = function() {
        return $scope.model.length == 0;
    }
Next update the html with the list definition to this:
        <div class="span4 offset2">
            <ul id="sourceList"
                dnd-between-list="source,targetList"
                ng-class="{'minimalList':sourceEmpty()}">
                <li class="alert alert-error nomargin"
                    ng-repeat="item in source"></li>
            </ul>
        </div>
        <div class="span4">

            <ul id="targetList"
                dnd-between-list="model,sourceList"
                ng-class="{'minimalList':sourceEmpty()}">
                <li class="alert alert-info nomargin"
                    ng-repeat="item in model"></li>
            </ul>
        </div>
You can see we added a ng-class attribute that adds the minimalList class whenever a list is empty. The last thing we need to add is this minimalList style, which looks like this:
        .minimalList {
            min-height: 100px;
        }
And now, we can also drag and drop from one list to another, when either one is empty! Simple right? You should be able to use this without changing much.